HTML To PDF CI
Why I created this tool
 In the process of creating my new static site, I noticed I was regenerating my resume PDF whenever I updated the source HTML.
Since the PDF is derivative of the HTML, I didn't want to maintain two sources of truth.
My friend, Dylan, suggested that I create a continuous integration (CI) module to generate this PDF on build.
We both have web based resumes and figured this was something that could be useful to others as well.
It seemed like a straightforward task, so I started planning and designing what this tool would do.
In the process of creating my new static site, I noticed I was regenerating my resume PDF whenever I updated the source HTML.
Since the PDF is derivative of the HTML, I didn't want to maintain two sources of truth.
My friend, Dylan, suggested that I create a continuous integration (CI) module to generate this PDF on build.
We both have web based resumes and figured this was something that could be useful to others as well.
It seemed like a straightforward task, so I started planning and designing what this tool would do.
If you only want to see the source code, you can view it on our weekend project's GitHub! Our weekend project is an organization that some friends and I created for projects that we can all easily contribute to.
Requirements of the module
Which argument parser to use?
I've used Commander.js in the past to create Node command line interface (CLI) applications, and so I started with this. Unfortunately, it doesn't have an easy prompt interface from what I could tell. I wanted to have an experience similar to release-it and AWS' SAM CLI. Because of this, I pivoted my CLI over to using inquirer because of its easy to use prompts and the fact that release-it uses it.
Setting up an easy to use CLI using inquirer was a breeze! After viewing the documentation on how to create questions, I created my list of question prompts and told inquirer to use them. For example:
const inquirer = require('inquirer');
let question = {
    type: 'input',
    name: 'mainInput',
    message: 'Please enter anything',
};

inquirer.prompt(question).then(answer => {
    console.log(`You entered ${answer.mainInput}!`);
});
When you run the previous snippet will give you this output.
node index.js
? Please enter anything <someOtherThing>
You entered someOtherThing!
How to turn the interactive CLI into a CI CLI
So I have a CLI parser/prompter that I'm happy with, but I need some other parts to make the CI part of this work.
I'll need some flag I can pass to my CLI so that it skips interactive mode.
But then I'll also need some kind of configuration file so the automated CLI knows what to pass to my main html-to-pdf logic.
Adding a CI flag is straightforward enough, I added a check for process.argv[2] and if it's equal to --ci then call the main logic with the configuration file.
As for the configuration file, I went with using a JSON file that stores the prompt responses.
How to convert HTML content to PDFs
I knew beforehand that browsers can generate PDFs from HTML content, so I figured Chrome might expose that functionality on the command line. Turns out that this is the case, that one can generate PDFs using headless Chrome. To use headless Chrome my users would already have to have Chrome installed on their machines. While this is a relatively safe bet (a quick google search shows that Chrome has 60%+ of the market share), I want my dependencies contained in my module. Instead of headless Chrome, I picked puppeteer instead. Since using these browsers/tools to generate PDFs is a common use case, the puppeteer package has some example code on how to achieve my use case:
const puppeteer = require('puppeteer');

(async () => {
  const browser = await puppeteer.launch();
  const page = await browser.newPage();
  await page.goto('https://news.ycombinator.com', {waitUntil: 'networkidle2'});
  await page.pdf({path: 'hn.pdf', format: 'A4'});

  await browser.close();
})();
All right, so I have my current requirements and a good place to start implementing. Even if I miss some requirements, it's not a big deal. All I have to do is iterate and improve if I discover missing features or requirements.
The application's logic
I want the application to take in some parameters, generate a PDF and place the PDF in a location based on the previous parameters.
Again, thanks to the puppeteer snippet, generating a PDF will be straightforward (or so I thought).
In order to place the PDF in a directory somewhere, we will use Node's fs module.
Puppeteer
Puppeteer is a Node library which provides a high-level API to control Chrome or Chromium over the DevTools Protocol. Puppeteer runs headless by default, but can be configured to run full (non-headless) Chrome or Chromium.
In order to called the generated PDF a success, it has to pass some test. In this instance, I have my reference resume PDF that I will compare against.
Generating the PDF
So we'll go ahead and modify the snippet to create our PDF and we should be done!
const puppeteer = require('puppeteer');

// If you haven't seen this pattern before, this is an
// immediately invoked function expression (IIFE)
// https://developer.mozilla.org/en-US/docs/Glossary/IIFE
(async () => {
  const browser = await puppeteer.launch();
  const page = await browser.newPage();

  // Instead of going to hackernews,
  // we want to open our source HTML document
  await page.goto('file://D:/Repos/static-site/_site/resume/web-resume/index.html', {waitUntil: 'networkidle2'});
  await page.pdf({path: 'hn.pdf', format: 'Letter'});

  await browser.close();
})();
Unfortunately, that didn't work. When I tried this, I was met with
undefinedwhich is not what I was expecting. So it appears that puppeteer doesn't like trying to open local files using the file protocol...no big deal.
Instead of trying to access the file through a file protocol, we'll spin up an express server and host the file instead.
const puppeteer = require('puppeteer');
const express = require('express');

(async () => {
    // Spin up express
    const app = express();

    // Since we want to host static content, we use
    // express' built in `static` middleware
    app.use(express.static('_site'));
    const server = app.listen(5001, async () => {

        // Our previous snippet
        const browser = await puppeteer.launch();
        const page = await browser.newPage();

        // We now navigate to localhost
        // instead of using the file protocol
        await page.goto('http://localhost:5001/resume/web-resume/index.html', { waitUntil: 'networkidle0' });
        await page.pdf({ path: 'hn.pdf', format: 'Letter' });

        await browser.close();
        server.close(() => {
            console.log(`Closing server`);
        });
    });
})();
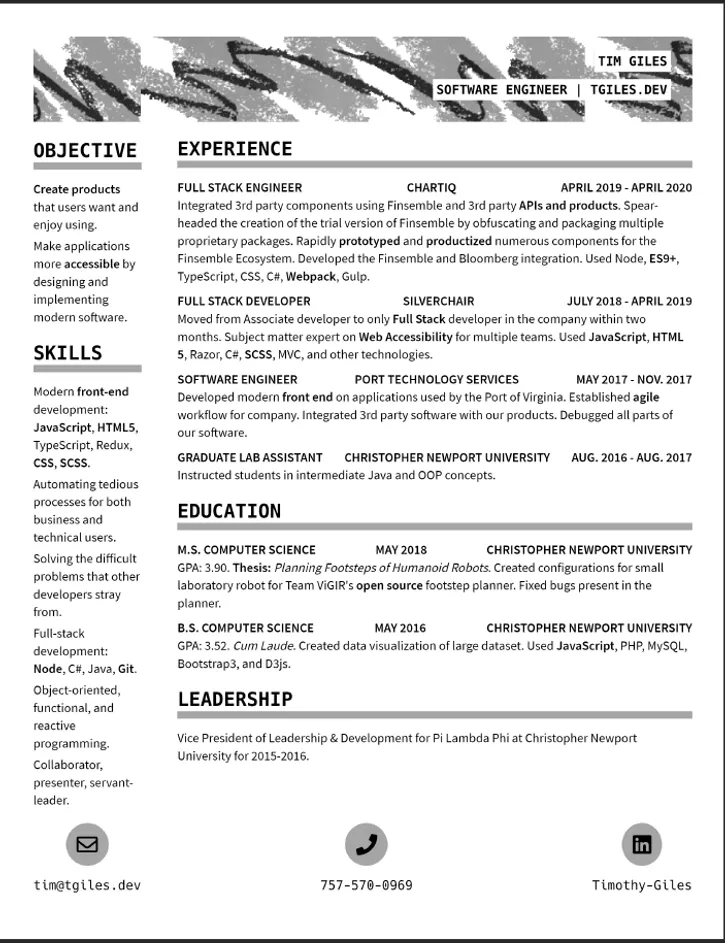
Using this snippet, we are able to generate the following PDF
which is better than no generated PDF, but is missing some details. First, there are no margins which makes this document look terrible! Second, we lost the circles on our contact information. Third, we lost the header background. Let's go ahead and fix this.
const puppeteer = require('puppeteer');
const express = require('express');

(async () => {
    const app = express();
    app.use(express.static('_site'));
    const server = app.listen(5001, async () => {
        const browser = await puppeteer.launch();
        const page = await browser.newPage();
        await page.goto('http://localhost:5001/resume/web-resume/index.html', { waitUntil: 'networkidle0' });
        await page.pdf({
            path: 'hn.pdf',
            format: 'Letter',

            // printBackground will display our background heading
            printBackground: true,

            // Chrome's print to PDF uses these margins
            margin: {
                top: '0.4 in',
                left: '0.4 in',
                right: '0.39 in',
                bottom: '0.39 in'
            }
        });

        await browser.close();
        server.close(() => {
            console.log(`Closing server`);
        })
    });
})();
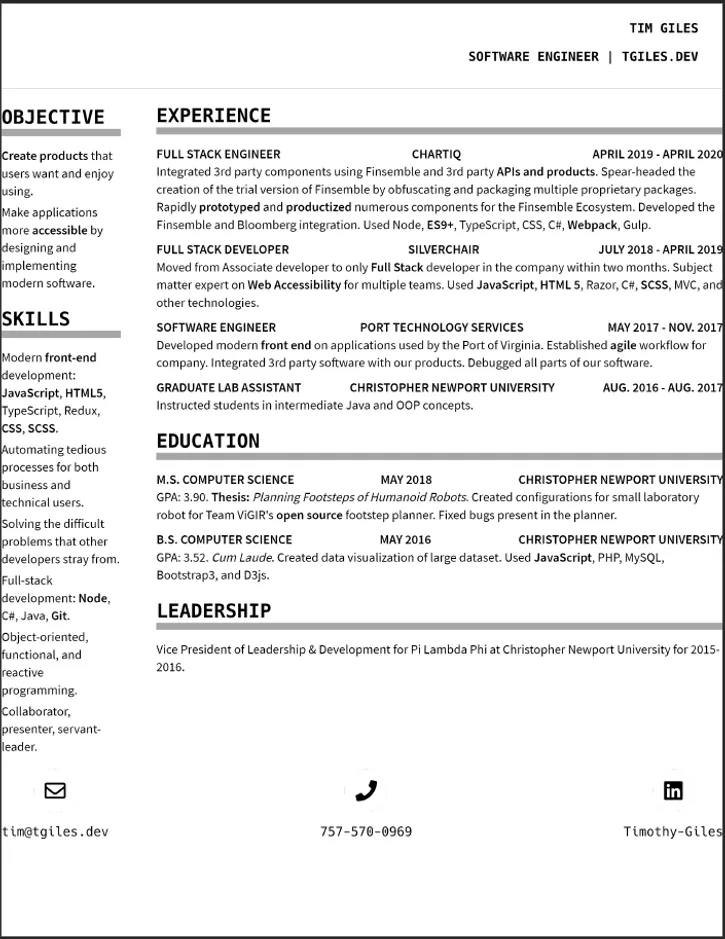
We go ahead and run this snippet and...

🎉 sweet! We now have the main logic figured out, we now need to extract magic strings and variables so that passed parameters create the variables we need!
Inquirer
This part is where inquirer will come in handy.
By handling all the input and creating a compiled options object, we can pass the options to our main logic.
Additionally, if we call our CLI with the --ci flag then our interface will run the PDF generation automatically.
So I create the options object by asking the following prompts:
- Enter a file name for generated PDF
- Enter a destination path for generated PDF
- Enter the file name of the source HTML document
- Enter the path of the source HTML document
- Enter the path to the generated site folder
- Save responses to .htmltopdf.json?
Inquirer has different prompt formats you can use such as: input, password, list, checkbox, confirm, and others.
For my file name prompts, I used the simple text input prompt.
Since entering file paths can be tedious, I wanted prompt format that could speed up this process.
Inquirer has some featured plugins and one of these plugins is a fuzzy path search!
By using this fuzzy path search, a user can more easily enter or find the exact path they want.
Finally, I use the confirm format for the "Save responses..." which is a yes/no prompt.
After some feedback from our-weekend-project however, I expanded the number of questions in the prompt to create a more custom experience. In addition to the previous prompts, the 0.1.x release of this tool has these additional questions:
- Print background graphics?
- Print in landscape orientation?
- Use custom margins for the generated PDF?
- If true:
- Enter top margin in px, in, mm, or cm
- Enter left margin in px, in, mm, or cm
- Enter right margin in px, in, mm, or cm
- Enter bottom margin in px, in, mm, or cm
- Select a paper format
- Options include:
- Letter
- Legal
- Tabloid
- Ledger
- A0
- A1
- A2
- A3
- A4
- A5
- A6 I also removed the following questions:
- Enter the name of the source HTML document
- Enter the path to the generated site folder
By adding and removing the previous questions, the tool can be more generic and used in other environments that I did not originally account for.
Summary
I originally created the tool to work with static site generators and specifically Eleventy. Again, after receiving feedback, I've made changes that allow more people to use this tool in a workflow that makes sense to them. Now, after this work, there is another prompt-based CLI/CI PDF creation tool available for use on NPM. Feel free to use this tool in your workflow and open any relevant issues in the GitHub repository!